Config PHPList to send bulk email from PowerMTA (PMTA)
Once you get your postfix server running for a while, you may see that the bottleneck is not the hardware but the rate in which you are able to send out email to different providers.
Instead of wasting idle resources, we can just add an IP address to the server and setup Postfix to run in a multi instance configuration. This way, we can utilise what we already have and double the email throughput of the server.
Preparations
1. First, we need to add one or more IP addresses to our host.
2. Make sure a postfix server is running.
3. Enable the multi instance support, run the command:
postmulti -e init
4. Create the first instance:
postmulti -I postfix-2 -G outgoing -e create
-I Is the nick name for the instance. You can use the hostname or whatever you like.
-G is the group name. In this post we are not using groups so just name it whatever you think describes it best. An example use for groups, is the ability to reload some of the instances while keeping the rest running.
The process will create new folder to hold both the configuration and the postfix mail queue. The structure is fairly simple but important to note for interacting with the instances:
Configuration files such as the main.cf files will be at /etc/instancename/ and in our example, under /etc/postfix-2/
The queue will be at /var/spool/instancename/ and in our example, under /var/spool/postfix-2/
5. Assigning an ip address to an instance
Lets assume that we have two IP addresses available on the server – 192.168.50.44 192.168.50.45
For the main instance, which is configured in /etc/postfix, we will keep the localhost listener, and add a specific address:
Edit the /etc/postfix/main.cf file and look for the line:
inet_interfaces = all
And change it to:
inet_interfaces = localhost, 192.168.50.44
open /etc/postfix/master.cf, look for the line:
smtp unix - - n - - smtp
And change it to:
smtp unix - - n - - smtp -o smtp_bind_address=192.168.50.44
This means that the base postfix instance is now listening and sending through the localhost address and 192.168.50.44
For each of the other instances, edit the main.cf file located under /etc/instancename and specify which IP address will be in use. To follow with our example, edit the /etc/postfix-2/main.cf file and replace:
inet_interfaces = all
With:
inet_interfaces = 192.168.50.45
open /etc/postfix-2/master.cf, look for the line:
smtp unix - - n - - smtp
And change it to:
smtp unix - - n - - smtp -o smtp_bind_address=192.168.50.45
6. Restart the postfix service after making these change.
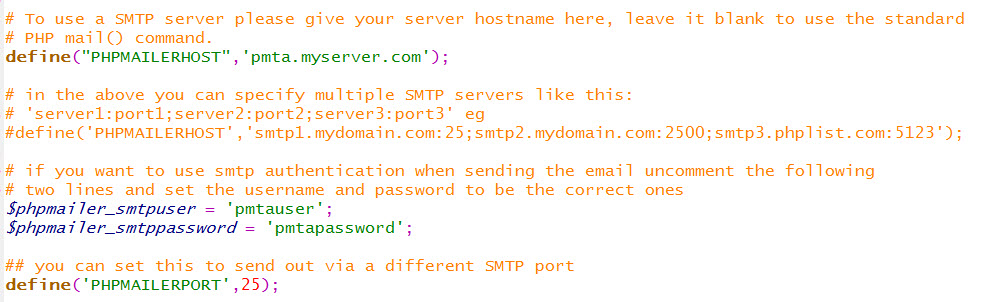
7. Install one or multiple phplist
8. Configure each phplist to send email from different postfix instances
add the following code to the beginning of admin/index.php :
putenv("MAIL_CONFIG=/etc/postfix-2");
(note: use variable for “postfix-2” if you only have one phplist install)
9. Specify a list of user name are allowed to submit mail in /etc/postfix/main.cf or /etc/postfix-2/main.cf for each instance
authorized_submit_users = testuser
10. (Option) Commands to start/stop/enable/disable postfix instance:
postmulti -i postfix-2 -p start

postmulti -i postfix-2 -p stop

postmulti -i postfix-2 -e enable

postmulti -i postfix-2 -e disable
Now, we can schedule multiple phplist to run at the same time and we have double the email throughput of the server.